Under floor borer treatment is a systematic process involving the application of residual insecticides and wood preservatives to sub-floor timbers, specifically targeting bearers, joists, and the underside of floorboards. To be effective, this chemical intervention must be combined with environmental controls, such as installing vapor barriers and improving ventilation, to reduce the moisture content that allows borer larvae to thrive.
For homeowners in Auckland, the battle against the Common House Borer (Anobium punctatum) is often fought in the dark, damp recesses of the sub-floor. This area of the home is critical to structural integrity yet remains the most neglected. Without proper intervention, borer larvae can chew through the foundation of a property for years before the damage becomes visible in the living areas above. This guide provides a definitive roadmap to eradicating these pests and securing your home’s future.
For comprehensive solutions to other household pests, consider learning about Effective Spider Nest Removal Techniques for Auckland Properties.
Why Borer Thrive in Damp Sub-Floors
To successfully execute an under floor borer treatment, one must first understand the enemy. The Common House Borer is not merely attracted to wood; it is attracted to conditions that make wood palatable. In the humid climate of Auckland, sub-floors often act as incubators for these pests.
The Moisture Connection
Borer larvae have a difficult time digesting dry timber. Wood with a moisture content below 12% is generally considered safe from severe infestation because the larvae struggle to extract the necessary nutrients to survive and pupate. However, sub-floors in New Zealand often suffer from rising damp, poor drainage, and lack of sunlight, creating a “greenhouse effect” under the house.
When the moisture content of bearers and joists exceeds 15-18%, the wood fibers soften. This allows the larvae to tunnel with ease, consuming the cellulose and compromising the timber’s strength. This is why borer damage is almost always more severe on the south side of a house or in areas with poor ventilation.
The Lifecycle Trap
The sub-floor provides the perfect shelter for the borer lifecycle. Adult beetles emerge from flight holes during the flight season (typically November to March). In a living room, these beetles might fly out a window. In a sub-floor, they are contained. They mate and lay eggs back into the cracks, end-grain, and old flight holes of the same timbers they emerged from. This results in a compounding infestation where the population density increases exponentially year after year, hidden from view.

Identifying Active Infestations in Sub-Floor Timbers
Before applying any chemicals, you must confirm activity. Old houses often have “historic” borer damage that is no longer active. Treating inactive wood is a waste of resources, though preventative treatment is always recommended in high-risk zones.
Similarly, recognizing Signs of Cockroach Infestation or other pests requires specific knowledge and inspection.
Visual Indicators
Equip yourself with a bright LED headlamp and a screwdriver before entering the crawl space. Look for the following signs:
- Fresh Flight Holes: These are round, approximately 2mm in diameter, and have sharp, clean edges. Old holes will look dark and weathered.
- Frass (Borer Dust): This is the most reliable sign of activity. Look for piles of fine, blonde-colored dust on the ground below joists or streaming out of flight holes. This dust is the excrement of the larvae.
- Structural Sponginess: Poke the bearers and joists with a screwdriver. If the tool sinks in easily or the wood crumbles, the internal structure has been honeycombed by larvae.
Comprehensive Under Floor Borer Treatment Methods
Effective under floor borer treatment requires a multi-faceted approach. Relying solely on a “bomb” or fogger is rarely sufficient for established infestations in structural timber.
For a detailed comparison of different application methods, including the effectiveness of various products, refer to insights on Borer Bombs vs Professional Spray.
Surface Spraying with Residual Insecticides
The most common method involves spraying all exposed timber surfaces with a residual insecticide, typically containing Permethrin or a Boron-based compound. Wood preservation chemistry relies on the lifecycle of the beetle. The spray does not necessarily kill the larvae deep inside the wood immediately. Instead, it creates a toxic barrier.
When the adult beetle chews its way out of the timber to mate, it ingests the treated wood at the surface and dies. Furthermore, if eggs are laid on the treated surface, the hatching larvae die before they can bore into the wood. This breaks the reproductive cycle. For this to work, every inch of the timber must be coated—top, bottom, and sides.
Injection for Deep-Seated Infestations
For valuable native timbers (like Rimu or Matai flooring) or structural bearers that show significant activity, surface spraying may not be enough. Injection treatment involves:
- Drilling small holes into the infected timber at regular intervals.
- Injecting a specialized insecticide fluid directly into the galleries (tunnels) created by the larvae.
- This forces the chemical through the labyrinth of tunnels, killing larvae deep within the wood that might otherwise feed for another year or two before emerging.
Preparation is Key
Chemicals cannot penetrate dust and cobwebs. Before any under floor borer treatment begins, the sub-floor must be cleaned. This often involves sweeping or vacuuming the underside of the floorboards and joists. If the spray lands on a layer of dust, it will not bond with the timber fibers, rendering the treatment ineffective.
The Critical Role of Sub-Floor Ventilation
Chemical treatments treat the symptom; ventilation treats the cause. As mentioned earlier, dry timber is resistant to borer. Therefore, lowering the humidity in the sub-floor is arguably the most permanent form of pest control.
Assessing Airflow
Walk around the perimeter of your home. Are the sub-floor vents blocked by garden beds, decks, or piled rubbish? According to New Zealand building standards, there should be cross-flow ventilation that ensures no “dead air” pockets exist under the house. Stagnant air allows moisture from the ground to condense on the cool timber, softening it for the borer.
Mechanical Ventilation Solutions
In many Auckland homes, passive vents are insufficient due to the density of surrounding housing or the topography of the land. In these cases, installing mechanical ventilation systems is necessary. These are low-voltage fans installed into the vent spaces that actively suck moist air out of the sub-floor and pull fresh, drier air in. This constant air exchange dries out the timbers, hardening the cellulose and making it difficult for larvae to survive.
Installing Vapor Barriers and Ground Sheets
If your home sits on damp clay or soil, the ground is constantly releasing moisture vapor upwards. This is known as rising damp. Even with good ventilation, the volume of moisture rising from the earth can overwhelm the sub-floor environment.
The Ground Moisture Barrier Solution
A ground moisture barrier (often called a vapor barrier) is a thick polythene sheet (usually 250 microns) laid over the soil under the house. This sheet acts as a cap, trapping the moisture in the ground and preventing it from rising into the sub-floor cavity.
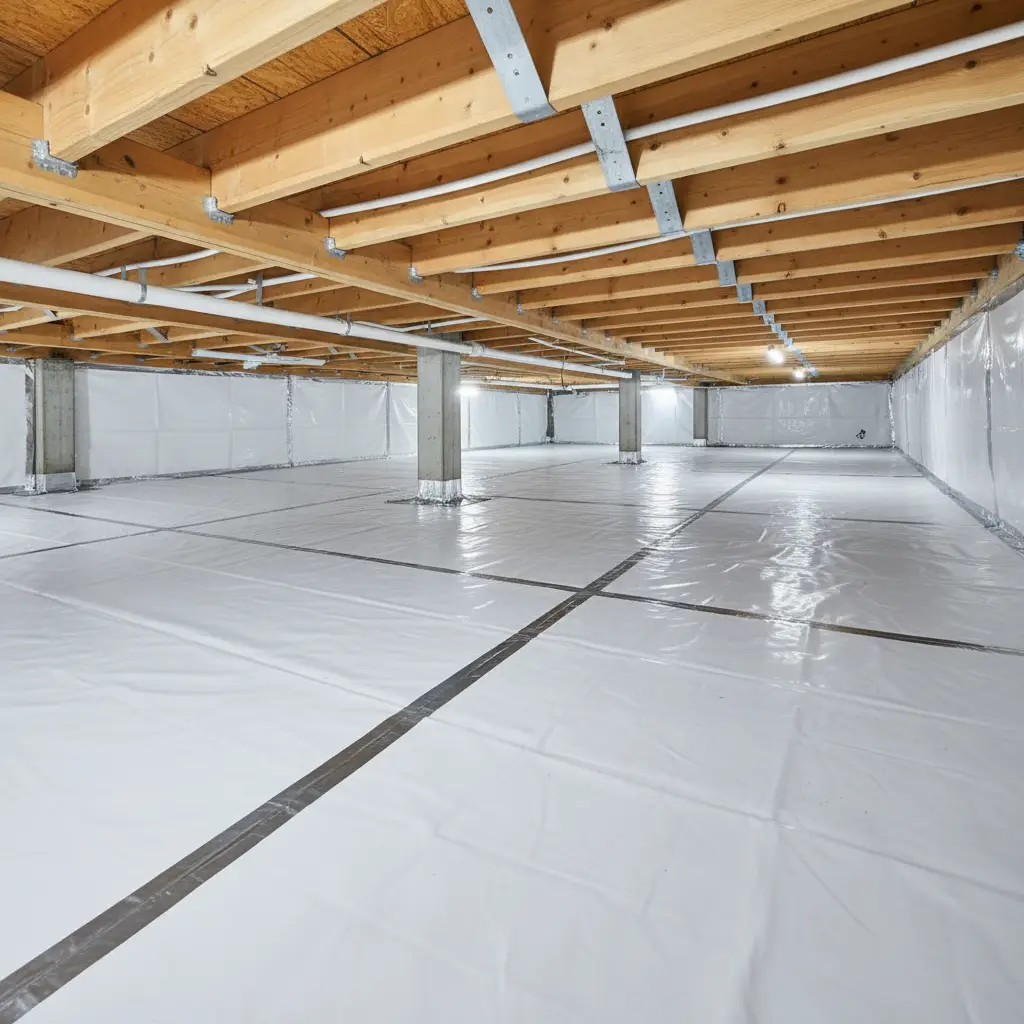
Installation Best Practices
To be effective as an adjunct to under floor borer treatment, the barrier must cover 100% of the soil. All seams must be taped with specialized joining tape, and the sheet should be pinned or taped around piles and foundations to ensure no gaps remain. Research indicates that installing a ground vapor barrier can lower the moisture content of sub-floor timbers significantly, often bringing them below the threshold required for borer survival.
Safety Protocols and Professional Application
Treating a sub-floor is hazardous work. The space is confined, often dark, and may contain other hazards such as electrical wiring, asbestos, or sewage leaks. Furthermore, the chemicals used for borer control, while safe when dry, are hazardous during application.
DIY vs. Professional Pest Control
While DIY products exist, they often lack the residual longevity of professional-grade solvents. Professionals also utilize high-pressure spray units that atomize the treatment, creating a mist that penetrates cracks and crevices that a hand-pump sprayer cannot reach.
Safety Gear is Non-Negotiable: If attempting this yourself, you must wear:
- A full-face respirator rated for organic vapors.
- Disposable Tyvek coveralls.
- Chemical-resistant gloves.
- Eye protection (if not using a full-face mask).
For detailed safety standards regarding chemical handling in residential areas, refer to resources provided by the Environmental Protection Agency or local equivalents.
People Also Ask (FAQs)
How much does under floor borer treatment cost?
The cost varies depending on the size of the footprint and the severity of the infestation. In Auckland, a standard treatment for a 100sqm home typically ranges between $800 and $1,500. This price may increase if insulation removal or ground vapor barrier installation is required.
Can I treat under floor borer myself?
Yes, you can treat it yourself using solvent-based insecticides and a garden sprayer, but it is physically demanding and hazardous. Professional treatments are generally more effective due to the use of high-pressure equipment and stronger, commercial-grade residual chemicals.
How long does borer treatment last?
A professional under floor borer treatment typically offers protection for 10 years or more. However, this warranty is often contingent on the sub-floor remaining dry. If leaks or dampness return, the chemical barrier may degrade faster, and the conditions for re-infestation will return.
How do I know if the borer is active?
The clearest sign of active borer is the presence of fresh, blonde-colored dust (frass) appearing below the timber or ejecting from flight holes. If the holes are dark and there is no dust, the damage may be historic and inactive.
Does borer eat treated timber?
Borer generally cannot survive in timber treated to H1.2 hazard class or higher (boron treated). However, many older homes were built with untreated native timbers. If you install new treated timber, it is immune, but the existing untreated structure remains vulnerable.
What is the best time of year for borer treatment?
The best time to treat is late winter or early spring (August to October in the Southern Hemisphere), just before the flight season begins. This ensures the insecticide is fresh and potent on the surface when the beetles begin to emerge in November.